
如何在 React 中构建天气应用
 浏览:736
If you want to master crucial web development skills like working with API's, fetching data, and asynchronous functions such as async and await in React, then building a weather app is the best way to learn.
It is also a fun project since you get the see real-time weather and weather forecasts.
In this tutorial, we will use React to build a fully functional weather app that will show the weather for any city and as a 5-day weather forecast for the city.
In addition to knowing whether it will rain tomorrow ?, you will also learn these concepts:
- How to communicate with external APIs
- Data fetching in React
- Asynchronous operations and the mysteries of async and await.
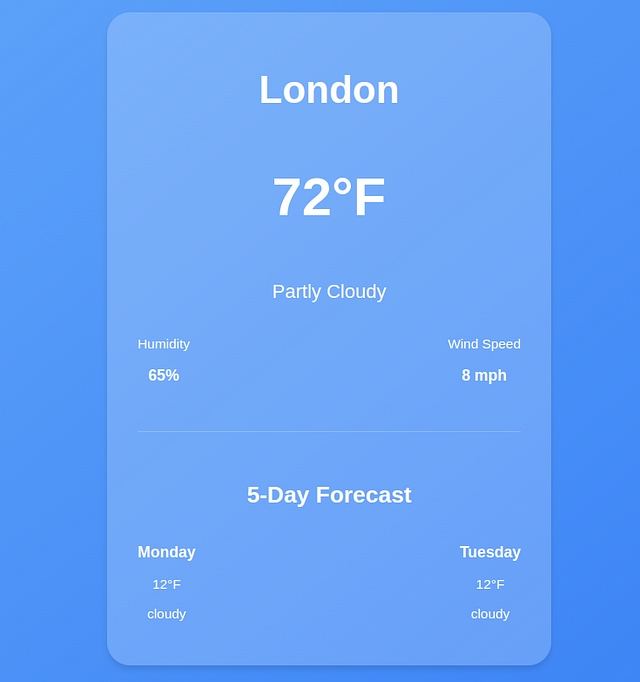
By the end of this tutorial, you'll have build an app that looks something like this:

If you need to brush up on your React fundamentals, read this Tutorial:
Getting Started with React: A Beginner's Complete Guide
Let's get started.
Development Environment
Vite is a build tool designed for a faster and more efficient development experience. It comes with a dev server that enhances native ES modules with capabilities like extremely fast Hot Module Replacement (HMR) and a build command that utilizes Rollup to bundle code into highly optimized static assets for production.
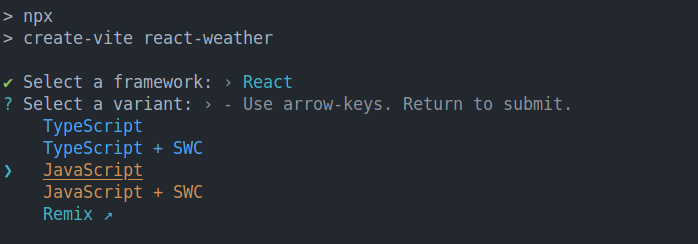
In your terminal, issue this command which will create a new application called react-weather
npm create vite@latest react-weather
In the next step, select Reat as the framework and JavaScript as the variant.
Once Vite creates the application, cd into the react-weather folder and run npm install and npm run commands.
 cd react-weather
 npm install
 npm run dev
Now your application should be running at http://localhost:5173/
Building the Interface
We will start by building the UI, in your app.jsx file, and delete all the content in the returned fragment. Your app.jsx should now look like this:
import { useState } from 'react'
import './App.css'

function App() {

  return (


    >
  )
}

export default App
The UI will have 3 sections.
- Header: this will show the city, temperature, and weather conditions
- Weather details section: this section will show the Humidity and wind speed
- Forecast section: this will show the weather forecast for the next 5 days for each city. Each day will show the temperature and weather conditions (cloudy, sunny, overcast) and so on.
Inside the return statement, let's start by adding a wrapper div. This div element will contain all the sections:
import { useState } from 'react'
import './App.css'

function App() {

  return (


  )
}

export default App
Inside the wrapper, add a header with an
to display the city, a element for the temperature, and another/>for the overall weather condition.import { useState } from "react";
import "./App.css";
function App() {
return (
London
60°F
Cloudy
);
}
export default App;
In the details section, we want to display the humidity and the wind speed in a row, so each will be in its div element.
export default App;

import { useState } from "react";
import "./App.css";

function App() {
  return (


        London
        60°F
        Cloudy


          Humidity
           60%


          Wind Speed
          7 mph


  );
}
Lastly, the forecast section will have a title and a couple of list items for each day. For the list items, let's start by displaying two days for now.
export default App;

import { useState } from "react";
import "./App.css";

function App() {
  return (


        London
        60°F
        Cloudy


          Humidity
           60%


          Wind Speed
          7 mph


        5-Day Forecast


            Monday
            Cloudy
            12°F


            Monday
            Cloudy
            12°F


  );
}
So far, our app now looks like this:

Styling with CSS
To make our interface beautiful, let's add some style, we will use CSS. In the main.jsx file, we already have this import which imports all the global styles for our app
import './index.css'
Let's start by styling the body by using flex.
body {
  min-height: 100vh;
  background: linear-gradient(to bottom right, #60a5fa, #3b82f6);
  display: flex;
  align-items: center;
  justify-content: center;
  padding: 1rem;
  font-family: Arial, sans-serif;
}
Here, we have set justify-items:center and justify-content:centerto ensure all the content is centered horizontally and vertically.
For the wrapper, let's add a different background color, a min-width, a border-radious and a box shadow, and also a margin on all sides.
.wrapper {
  background: rgba(255, 255, 255, 0.2);
  border-radius: 1.5rem;
  padding: 2rem;
  min-width: 400px;
  box-shadow: 0 4px 6px rgba(0, 0, 0, 0.1);
}
Add a bigger font size to the city name and temperature elements and make them bold. The overall styles for the header elements will look like this:
.city {
  font-size: 2.5rem;
  font-weight: bold;
}
.temperature {
  font-size: 3.5rem;
  font-weight: bold;
}

.condition {
  font-size: 1.25rem;

}
To ensure the elements in the weather details section (i.e, humidity and wind speed) are aligned on the same row, use display: flex and justify-content: space-between; These are the styles for the weather detail and its elements:
.weather-details {
  display: flex;
  justify-content: space-between;
  align-items: center;
  margin-bottom: 2rem;
}
Lastly, for the weather forecast section,add the following styles:
.forecast {
  border-top: 1px solid rgba(255, 255, 255, 0.2);
  padding-top: 2rem;
}

.forecast-header {
  font-size: 1.5rem;
  font-weight: bold;
}

.forecast-days {
  display: flex;
  justify-content: space-between;
}

.forecast-day {
  font-weight: bold;
}

.forecast-temp,
.forecast-condition {
  font-size: 0.875rem;
}
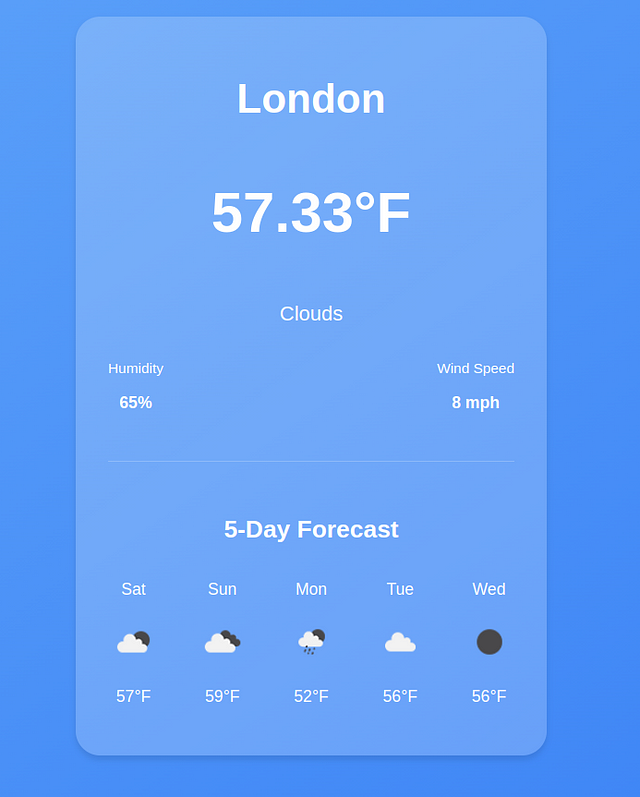
Now our App looks like this:
Get Real-Time Weather Data
So far we are using placeholder data, to get real-time weather information, we will use the openweather API. Head over to https://openweathermap.org/api and get a FREE API key.
Define the API_KEY.
function App() {

  const API_KEY ="your_api-key";

}
In a production environment, you should add sensitive data like API keys in a .env file.
Store Weather Data using State
In React, state is a crucial concept because it allows components to manage and respond to dynamic data. When you fetch data from an API, you need a way to store and manipulate that data within your component.
This is where state comes in.
Everything in a React component that can change over time is managed by the state. When the state changes, the React component will rerender and reflect the new changes.
For example, in our weather app, we want to get the current weather information for a specific city and store it in the state.
To do that, we will use the useState hook. The syntax for this hook looks like this:
const [value, setValue] = useState(initialValue);
- value is the current state value.
- setValue is a function that allows you to update the state.
- initialValue is the value that the state starts with (it can be a number, string, object, or even an array).
Define the weather data state at the top of the App function. The initial value will be null
function App() {
  const [weatherData, setWeatherData] = useState(null);
}
- weatherData will store the weather details
- setWeather will update the weather details
Define the state for the city and set the initial state variable of the city name to London
const [city, setCity] = useState("london");
Fetch Data with the useEffect Hook
React by default has no way of handling side effects. Side effects are operations that occur outside of Reacts control such as asynchronous operations, local storage, e.t. c .
Since React components render when they mount, making an API request at this stage will not have access to the data yet since a fetch request takes time to complete.
In such cases, React uses the useEffect hook to perform side effects. The useEffect hook takes a function as the first parameter and a dependency array. Its syntax looks like this:
 useEffect(()=>{

  // perform side effects operations here

},[dependencies] )
The dependency array in the useEffect hook contains variables that determine when the effect should run. For example, in our case, the useEffect should run when the weather data changes rather than on every render.
Inside the useEffect, create an asynchronous function that will fetch the weather for a specific city from the Open weather API. Since it's an asynchronous operation, our function should also be asynchronous.
The function takes the cityName as the parameter
  useEffect(()=>{
    const fetchWeatherData = async (cityName) => {
      const url = `https://api.openweathermap.org/data/2.5/weather?q=${cityName}&appid=${API_KEY}&units=imperial`;
      const response = await fetch(url);
      const data = await response.json();

     }

  })
Once the data is fetched, use the setWeatherData setter function to update the state with the response data. Ensure to wrap your code in a try-catch block to handle any potential errors.
  useEffect(() => {
    const fetchWeatherData = async (cityName) => {
      try {
        const url = `https://api.openweathermap.org/data/2.5/weather?q=${cityName}&appid=${API_KEY}&units=imperial`;
        const response = await fetch(url);
        const data = await response.json();
        setWeatherData(data);
      } catch (error) {
        console.log(error);
      }
    };
  });
For the data to be fetched on mount, we need to invoke the fetch weather data function inside the useEffect.
When invoking the function, we will pass the value of the current city as the argument. This will ensure that when the app mounts for the first time, we already have some data to show for the value specified in the city state.
 useEffect(() => {
    const fetchWeatherData = async (cityName) => {
      try {
        const url = `https://api.openweathermap.org/data/2.5/weather?q=${cityName}&appid=${API_KEY}&units=imperial`;
        const response = await fetch(url);
        const data = await response.json();
        setWeatherData(data);
      } catch (error) {
        console.log(error);
      }
    };

    fetchWeatherData(city)
  });
If you check the logs with your developer tools, you will see that we are making multiple API requests on every render.
This is a very expensive operation,to prevent fetching on every render, we need to provide some dependencies to the useEffect. These dependencies will determine when an API call is made to the open weather API.
So let's add city in the dependency array to ensure API calls will only be made on the first mount or when the value of city changes.
  useEffect(() => {
    const fetchWeatherData = async (cityName) => {
      try {
        const url = `https://api.openweathermap.org/data/2.5/weather?q=${cityName}&appid=${API_KEY}&units=imperial`;
        const response = await fetch(url);
        const data = await response.json();
        setWeatherData(data);
        console.log(data);
      } catch (error) {
        console.log(error.message);
      }
    };

    fetchWeatherData(city)
  },[city]);
When we log the data, we get an object containing the weather details for the city of London.
{
    "coord": {
        "lon": -0.1257,
        "lat": 51.5085
    },
    "weather": [
        {
            "id": 801,
            "main": "Clouds",
            "description": "few clouds",
            "icon": "02d"
        }
    ],
    "base": "stations",
    "main": {
        "temp": 289.65,
        "feels_like": 289.16,
        "temp_min": 288.4,
        "temp_max": 290.92,
        "pressure": 1012,
        "humidity": 69,
        "sea_level": 1012,
        "grnd_level": 1008
    },
    "visibility": 10000,
    "wind": {
        "speed": 5.14,
        "deg": 270
    },
    "clouds": {
        "all": 20
    },
    "dt": 1729349117,
    "sys": {
        "type": 2,
        "id": 2075535,
        "country": "GB",
        "sunrise": 1729319499,
        "sunset": 1729357131
    },
    "timezone": 3600,
    "id": 2643743,
    "name": "London",
    "cod": 200
}
Now let's inject the weather details into the elements using JSX.
{weatherData && weatherData.main && weatherData.weather && (


      {weatherData.name}
      {weatherData.main.temp}°F
      {weatherData.weather[0].main}


        Humidity
        {Math.round(weatherData.main.humidity)}%


        Wind Speed
        {Math.round(weatherData.wind.speed)} mph


  >
)}
In JavaScript, the expression condition && is used for conditional rendering within React components.
The && operator checks two conditions and returns true only if both conditions are true. In our case, if weatherDataexists, the specified data properties will be rendered.
If weatherData is null (or undefined), the elements will not be rendered, preventing any errors that could occur from trying to access properties of null.
Get and Display the Weather Forecast in React
To get the forecast, we will do another fetch request in the same useEffect Hook using this API https://api.openweathermap.org/data/2.5/forecast?q=${CITY}&appid=${API_KEY}&units=imperial
First, create a forecast state to store the forecast data and initialize the initial value to an empty array.
const [forecast, setForecast] = useState([]);
Inside the fetchWeatherData function, make a fetch request to the above API, and set the forecast state to the response data.
  useEffect(() => {
    const fetchWeatherData = async (cityName) => {
      setCity(cityName);
      try {
        const url = `https://api.openweathermap.org/data/2.5/weather?q=${cityName}&appid=${API_KEY}&units=imperial`;
        const response = await fetch(url);
        const data = await response.json();
        setWeatherData(data);
        console.log(data);

        const foreCastresponse = await fetch(
          `https://api.openweathermap.org/data/2.5/forecast?q=${city}&appid=${API_KEY}&units=imperial`
        );
        const forecastdata = await foreCastresponse.json();

        const dailyForecast = forecastdata.list.filter(
          (item, index) => index % 8 === 0
        );
        setForecast(dailyForecast);
      } catch (error) {
        console.log(error.message);
      }
    };

    fetchWeatherData(city);
  }, [city]);
The forecast API usually returns the forecast after every 3 hours for the next 5 days, resulting into 40 data points, here is the truncated output.
{
    "cod": "200",
    "message": 0,
    "cnt": 40,
    "list": [
        {
            "dt": 1729360800,
            "main": {
                "temp": 59.92,
                "feels_like": 58.95,
                "temp_min": 56.59,
                "temp_max": 59.92,
                "pressure": 1013,
                "sea_level": 1013,
                "grnd_level": 1010,
                "humidity": 71,
                "temp_kf": 1.85
            },
            "weather": [
                {
                    "id": 801,
                    "main": "Clouds",
                    "description": "few clouds",
                    "icon": "02n"
                }
            ],
            "clouds": {
                "all": 17
            },
            "wind": {
                "speed": 3.29,
                "deg": 229,
                "gust": 5.64
            },
            "visibility": 10000,
            "pop": 0,
            "sys": {
                "pod": "n"
            },
            "dt_txt": "2024-10-19 18:00:00"
        },
        {
            "dt": 1729371600,
            "main": {
                "temp": 56.8,
                "feels_like": 55.85,
                "temp_min": 54.43,
                "temp_max": 56.8,
                "pressure": 1015,
                "sea_level": 1015,
                "grnd_level": 1012,
                "humidity": 78,
                "temp_kf": 1.32
            },
            "weather": [
                {
                    "id": 803,
                    "main": "Clouds",
                    "description": "broken clouds",
                    "icon": "04n"
                }
            ],
            "clouds": {
                "all": 59
            },
            "wind": {
                "speed": 4.09,
                "deg": 196,
                "gust": 10.11
            },
            "visibility": 10000,
            "pop": 0,
            "sys": {
                "pod": "n"
            },
            "dt_txt": "2024-10-19 21:00:00"
        },
The variable dt is a timestamp, so if we want to convert it to a human-readable time using the toLocaleDateString() method.
new Date(1729360800 * 1000).toLocaleDateString('en-US', { weekday: 'short' })
The output for this timestamp is sat
So for the array of 40 forecast items, we have used the filter function to filter based on the given (item, index) => index % 8 === 0condition.
(item, index) => index % 8 === 0: This condition means: "Only keep the forecast where the index is divisible by 8." Since the forecast is every 3 hours, every 8th item represents one forecast per day (3 hours × 8 = 24 hours).
So for example, given that the indices range from 0–39, every 8th index is added to the dailyForecast array. In total, we will have 5 instances of weather data.
Each weather forecast data point looks like this:
{
            "dt": 1729360800,
            "main": {
                "temp": 59.92,
                "feels_like": 58.95,
                "temp_min": 56.59,
                "temp_max": 59.92,
                "pressure": 1013,
                "sea_level": 1013,
                "grnd_level": 1010,
                "humidity": 71,
                "temp_kf": 1.85
            },
            "weather": [
                {
                    "id": 801,
                    "main": "Clouds",
                    "description": "few clouds",
                    "icon": "02n"
                }
            ],
            "clouds": {
                "all": 17
            },
            "wind": {
                "speed": 3.29,
                "deg": 229,
                "gust": 5.64
            },
            "visibility": 10000,
            "pop": 0,
            "sys": {
                "pod": "n"
            },
            "dt_txt": "2024-10-19 18:00:00"
        }
Since we have 5 instances, we will use the map() method to iterate and display the forecast for each day.
Update the forecast section as follows:
{forecast.length > 0 && (
5-Day Forecast
{forecast.map((day, index) => (
{new Date(day.dt * 1000).toLocaleDateString("en-US", {
weekday: "short",
})}
![{day.weather[0].description}](%7B%60http://openweathermap.org/img/wn/%24%7Bday.weather%5B0%5D.icon%7D.png%60%7D)
{Math.round(day.main.temp)}°F
))}
>
)}
Here, we are also checking if the forecast array contains data to ensure we don't loop over an empty array that will cause errors to pop up.
After checking the forecast data, we map over the forecast array and inject the following data for each day.
- day of the week
- weather icon
- temperature
Now our App looks like this:
Get custom Weather Information
Our app looks great, but we still can't fetch dynamic data. Let's add a search form at the top to allow the users to get information about any city.
But first, we need a state for the input field. Declare the state with an empty string as the initial value.
const [searchInput, setSearchInput] = useState("");
Create the form, bind the input to the searchInput state, and add the onChange event that will update the searchInput value when the user types a new city.
{/* the rest of the code */}
Here are the styles for the form.
.form {
  display: flex;
  justify-content: center;
  align-items: center;
  margin: 20px auto;
  padding: 10px;
  background-color: rgba(255, 255, 255, 0.3);
  border-radius: 10px;
  box-shadow: 0 4px 6px rgba(0, 0, 0, 0.1);
  max-width: 400px;
}

.search-input {
  flex: 1;
  padding: 10px;
  font-size: 16px;
  border: 1px solid rgba(255, 255, 255, 0.6);
  border-radius: 5px 0 0 5px;
  background-color: rgba(255, 255, 255, 0.2);

  outline: none;
  transition: border-color 0.3s ease;
}

.search-input::placeholder {
  color: rgba(255, 255, 255, 0.7);
}

.search-input:focus {
  border-color: #3b82f6;
}

.search-btn {
  padding: 10px 15px;
  font-size: 16px;
  color: white;
  background-color: #3b82f6;
  border: none;
  border-radius: 0 5px 5px 0;
  cursor: pointer;
  transition: background-color 0.3s ease;
}
Since we need to invoke the weatherData function when the form is submitted, we will move the function definition outside the useEffect hook but still call it since the app needs to display some data for the initial city value when it mounts.
const fetchWeatherData = async (cityName) => {
    setCity(cityName);
    try {
      const url = `https://api.openweathermap.org/data/2.5/weather?q=${cityName}&appid=${API_KEY}&units=imperial`;
      const response = await fetch(url);
      const data = await response.json();
      setWeatherData(data);
      console.log(data);

      const foreCastresponse = await fetch(
        `https://api.openweathermap.org/data/2.5/forecast?q=${city}&appid=${API_KEY}&units=imperial`
      );
      const forecastdata = await foreCastresponse.json();

      const dailyForecast = forecastdata.list.filter(
        (item, index) => index % 8 === 0
      );

      setForecast(dailyForecast);
    } catch (error) {
      console.log(error.message);
    }
  };

useEffect(() => {
    fetchWeatherData(city);
  }, [city]);
Get Weather Data when the Form is Submitted
After a user searches for a city with a search form, we need to call another function that will invoke the fetchWeatherData with the new city and update the weatherData state to the weather information for the new city.
Add an onSubmitevent to the form and reference the function as shown below.
When the form is submitted, it will fetch the weather information for the new city.
 function handleSearch(e) {
    e.preventDefault();
    fetchWeatherData(searchInput);
  }
Since the fetchWeatherData function already updates the new state of the weatherData state with the new data, we only invoke the function and pass the value of the new city from the user (searchInput).
Error Handling
When fetching data from API, various issues can occur. For example, in our case, the weather API might be down, or we might have an invalid API key, or we might have exhausted our daily API limit.
In this case, we need to add a proper error-handling mechanism so the user doesn't experience server errors.
For example, when the app loads for the first time, the forecast array will be empty, and the weatherData will be null. To ensure a good user experience, let's add error and loading states.
const [error, setError] = useState(null);
const [loading, setLoading] = useState(false)
In the fetchWeatherData function, just before any fetch happens, set the initial states of error and loading
  const fetchWeatherData = async (cityName) => {
    try {
     setLoading(true)
     setError(null)

     // the rest of the code

}
In the catch block, let's set the error state to a user-friendly message
} catch (error) {
    setError("Couldnt fetch data,please try again")

} finally {
    setLoading(false)

 }
In JavaScript, the finally clause in the try catch block is great for cleaning up. Regardless of the outcome of the API operation, we want to remove the loading state.
catch (error) {
    setError("Sorry, we couldn't retrieve the weather data at this time");

} finally {
    setLoading(false)

 }
To ensure the error and loading states are reflected in the UI, add this code just before the return statement
if (loading) returnLoading...
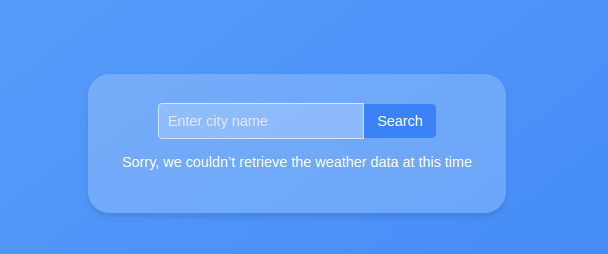
To display the error message if it occurs add this
tag after the form. {error && {error}
}
This condition ensures that if an error occurs, the error message stored in the state will be displayed.
Here is the app in loading state.

Here is the output when an error occurs.
Conclusion
We have come to the end of this tutorial. You can find the source code here.
If you found this tutorial a bit challenging, you might need to brush up on your React Fundamentals.
Get my Free React Guide and Level up.
Happy Coding.
-
 FastAPI自定义404页面创建指南response = await call_next(request) if response.status_code == 404: return RedirectResponse("https://fastapi.tiangolo.com") else: ...编程 发布于2025-05-20
 -
同实例无需转储复制MySQL数据库方法在同一实例上复制一个MySQL数据库而无需转储在同一mySQL实例上复制数据库,而无需创建InterMediate sqql script。以下方法为传统的转储和IMPORT过程提供了更简单的替代方法。 直接管道数据 MySQL手动概述了一种允许将mysqldump直接输出到MySQL clie...编程 发布于2025-05-20
-
如何克服PHP的功能重新定义限制?克服PHP的函数重新定义限制在PHP中,多次定义一个相同名称的函数是一个no-no。尝试这样做,如提供的代码段所示,将导致可怕的“不能重新列出”错误。 但是,PHP工具腰带中有一个隐藏的宝石:runkit扩展。它使您能够灵活地重新定义函数。 runkit_function_renction_re...编程 发布于2025-05-20
-
如何使用Python理解有效地创建字典?在python中,词典综合提供了一种生成新词典的简洁方法。尽管它们与列表综合相似,但存在一些显着差异。与问题所暗示的不同,您无法为钥匙创建字典理解。您必须明确指定键和值。 For example:d = {n: n**2 for n in range(5)}This creates a dicti...编程 发布于2025-05-20
-
为什么我的CSS背景图像出现?故障排除:CSS背景图像未出现 ,您的背景图像尽管遵循教程说明,但您的背景图像仍未加载。图像和样式表位于相同的目录中,但背景仍然是空白的白色帆布。而不是不弃用的,您已经使用了CSS样式: bockent {背景:封闭图像文件名:背景图:url(nickcage.jpg); 如果您的html,css...编程 发布于2025-05-20
-
如何在鼠标单击时编程选择DIV中的所有文本?在鼠标上选择div文本单击带有文本内容,用户如何使用单个鼠标单击单击div中的整个文本?这允许用户轻松拖放所选的文本或直接复制它。 在单个鼠标上单击的div元素中选择文本,您可以使用以下Javascript函数: function selecttext(canduterid){ if(do...编程 发布于2025-05-20
-
Python高效去除文本中HTML标签方法在Python中剥离HTML标签,以获取原始的文本表示 仅通过Python的MlStripper 来简化剥离过程,Python Standard库提供了一个专门的功能,MLSTREPERE,MLSTREPERIPLE,MLSTREPERE,MLSTREPERIPE,MLSTREPERCE,MLST...编程 发布于2025-05-20
-
在Ubuntu/linux上安装mysql-python时,如何修复\“ mysql_config \”错误?mysql-python安装错误:“ mysql_config找不到”“ 由于缺少MySQL开发库而出现此错误。解决此问题,建议在Ubuntu上使用该分发的存储库。使用以下命令安装Python-MysqldB: sudo apt-get安装python-mysqldb sudo pip in...编程 发布于2025-05-20
-
如何在Chrome中居中选择框文本?选择框的文本对齐:局部chrome-inly-ly-ly-lyly solument 您可能希望将文本中心集中在选择框中,以获取优化的原因或提高可访问性。但是,在CSS中的选择元素中手动添加一个文本 - 对属性可能无法正常工作。初始尝试 state)</option> < op...编程 发布于2025-05-20
-
JavaScript计算两个日期之间天数的方法How to Calculate the Difference Between Dates in JavascriptAs you attempt to determine the difference between two dates in Javascript, consider this s...编程 发布于2025-05-20
-
如何使用Python的请求和假用户代理绕过网站块?如何使用Python的请求模拟浏览器行为,以及伪造的用户代理提供了一个用户 - 代理标头一个有效方法是提供有效的用户式header,以提供有效的用户 - 设置,该标题可以通过browser和Acterner Systems the equestersystermery和操作系统。通过模仿像Chro...编程 发布于2025-05-20
-
为什么在我的Linux服务器上安装Archive_Zip后,我找不到“ class \” class \'ziparchive \'错误?Class 'ZipArchive' Not Found Error While Installing Archive_Zip on Linux ServerSymptom:When attempting to run a script that utilizes the ZipAr...编程 发布于2025-05-20
-
如何从PHP中的Unicode字符串中有效地产生对URL友好的sl。为有效的slug生成首先,该函数用指定的分隔符替换所有非字母或数字字符。此步骤可确保slug遵守URL惯例。随后,它采用ICONV函数将文本简化为us-ascii兼容格式,从而允许更广泛的字符集合兼容性。接下来,该函数使用正则表达式删除了不需要的字符,例如特殊字符和空格。此步骤可确保slug仅包含...编程 发布于2025-05-20
-
在细胞编辑后,如何维护自定义的JTable细胞渲染?在JTable中维护jtable单元格渲染后,在JTable中,在JTable中实现自定义单元格渲染和编辑功能可以增强用户体验。但是,至关重要的是要确保即使在编辑操作后也保留所需的格式。在设置用于格式化“价格”列的“价格”列,用户遇到的数字格式丢失的“价格”列的“价格”之后,问题在设置自定义单元格...编程 发布于2025-05-20
-
如何使用node-mysql在单个查询中执行多个SQL语句?Multi-Statement Query Support in Node-MySQLIn Node.js, the question arises when executing multiple SQL statements in a single query using the node-mys...编程 发布于2025-05-20


学习中文
- 1 走路用中文怎么说?走路中文发音,走路中文学习
- 2 坐飞机用中文怎么说?坐飞机中文发音,坐飞机中文学习
- 3 坐火车用中文怎么说?坐火车中文发音,坐火车中文学习
- 4 坐车用中文怎么说?坐车中文发音,坐车中文学习
- 5 开车用中文怎么说?开车中文发音,开车中文学习
- 6 游泳用中文怎么说?游泳中文发音,游泳中文学习
- 7 骑自行车用中文怎么说?骑自行车中文发音,骑自行车中文学习
- 8 你好用中文怎么说?你好中文发音,你好中文学习
- 9 谢谢用中文怎么说?谢谢中文发音,谢谢中文学习
- 10 How to say goodbye in Chinese? 再见Chinese pronunciation, 再见Chinese learning


